In an effort to improve the dust in my
shop, I decided to get a dust collector. My vacuum cart with a dustdeputy does a great job; however, I needed a larger volume
of air moved to remove more dust. I thought about an individual
cyclone separators such as one by Grizzly, but it was getting
expensive and I think my wife would not be happy.
With that, I started searching the
internet and decided to really soup up a Harbor Freight Dust
collector. Below is the final picture and a schematic of what I
built. In short, it’s a Harbor Freight dust collector, a Wynn
Engineering Filter, a salad bowl as an internal baffle, and a Super
Dust Deputy cyclone. To top it off, I just made my own remote
control switch using some relays and a $10 wireless remote for
Christmas tree lights. (Look for that Post Soon)
 |
| The System - Dust Collector with Cyclone |
To start the process, I used some great
resources, which I want to give credit too, such as:
I started with the Harbor Freight Dust collector, which using a super coupon, I was able to get
for $150. By itself, I don’t know that I would be the best dust
collector, but it sure makes a great starting point for something
larger. One reason for my thought is that I do not believe that a
5-micron filter is fine enough as it’s the dust you cannot see (<10
micron) that is dangerous to breathe in. The first improvement to
the dust collector was Wynn Engineering’s Nano filter.
With that filter, I now have better airflow than the original felt
bag and essentially HEPA filtration.
I have the standard Dust Deputy on a vacuum cleaner, which is amazing and I think every
woodworker should use it or something similar on a shop vac. With
experience with the standard Dust Deputy, I did not even hesitate to
get the Super Dust Deputy. I went with the plastic over
metal to save some money and I liked how it looked like the plastic
one starts the air to flow down and might work better.
While waiting on the filter and cyclone
to come in, I did some more reading one what people have done. I
decided to put some sort of extra separation within the dust
collector itself. I would have loved to have put in the Thein baffle, but because of the filter option I
got, I was unable to. Then I saw the articles that try and copy a
certain companies cone within a dust collectors. The company will
remain nameless; however they make nice white and yellow tools.
Great things have been to copy the cones used such as woks (&
here),
plant stands, dog food bowls,
frying pans, and chimney tops.
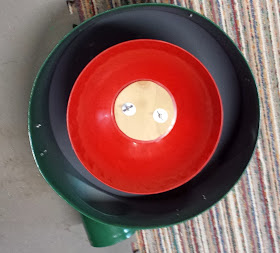
With that, I went down to the local GoodWill store to see what I
could find. For $1, I found a nice red plastic salad bowl. After
increasing the bowl’s strength with some plywood, I mounted it into
the dust collector. The way the filter attaches, the bowl had to be
easy to install and remove as it must be removed to adjust the toggle
bolts that hold the filter in place.
Using a 5” hose, I then ran the input
of the dust collector to the output of the cyclone filter (6”
output). I reduced the input of the cyclone (5”) to the standard
hose size of (4”). Eventually I would like to get the Rockler DustRight quick connects.
Without the fancy 4” Dust Right
connections, I have the hose attached to a 4” plastic part. The
plastic part is then connected to the part making the dust, such as
my table saw, using a 4” rubber connection, which is used to join
pipes. It actually works so well as somewhat of a quick connect, I
may never fork over the money for the expensive connections.
The bucket that has the dust deputy on it was lined with a
heavy-duty contractor grade trash bag. The lid was cut and a small
plastic window as put in to see the dust level. I used some white
caulk to seal any seam or connection on the Harbor Freight dust
collector, including around the seams near the filter. Lastly, I
noticed some dust leaking out around the bag, so I put some thin
weather stripping to help seal where bag goes.


No comments:
Post a Comment